When starting with photography, you’ll find many tips and techniques to understand, from the basics of shutter speed, aperture, and ISO to composition and lighting. However, today, we will focus on five techniques worth checking out when you embark on your first landscape photography trip.
HDR
Despite all the technological advancements over the last ten years, digital cameras still cannot perceive an image as well as the human eye can. One of the significant downfalls of any modern-day mirrorless camera is the dynamic range. The human eye can perceive up to 24 stops of light, while cameras such as the Nikon Z9 only have around 14.
Manufacturers, however, have implemented ways to increase the dynamic range in-camera using HDR processing. This method effectively takes several underexposed, correctly exposed, and overexposed images. The photographs are then saved to your memory card, allowing you to blend them later in Photoshop. Some cameras can combine the photos in-camera to create an HDR image; however, this is still a manual post-production process with most cameras. Before the days of mirrorless, this was an entirely manual process of setting each exposure individually before taking the shot and manually processing them. While I still manually process them in Photoshop, the ease of switching on HDR processing and letting the camera do the work makes it far quicker and easier, freeing up my time to explore the area for more potential photographs.
Next, I’ll use Adobe Camera Raw to open up my raw HDR images and blend them into a single image file. The advantage of doing this in Adobe Camera Raw or Lightroom (which has a similar interface) is that you can tweak the combined HDR image afterward and use the masks available in Camera Raw/Lightroom to enhance the photo further. It’s a quick and easy method to get fantastic results.
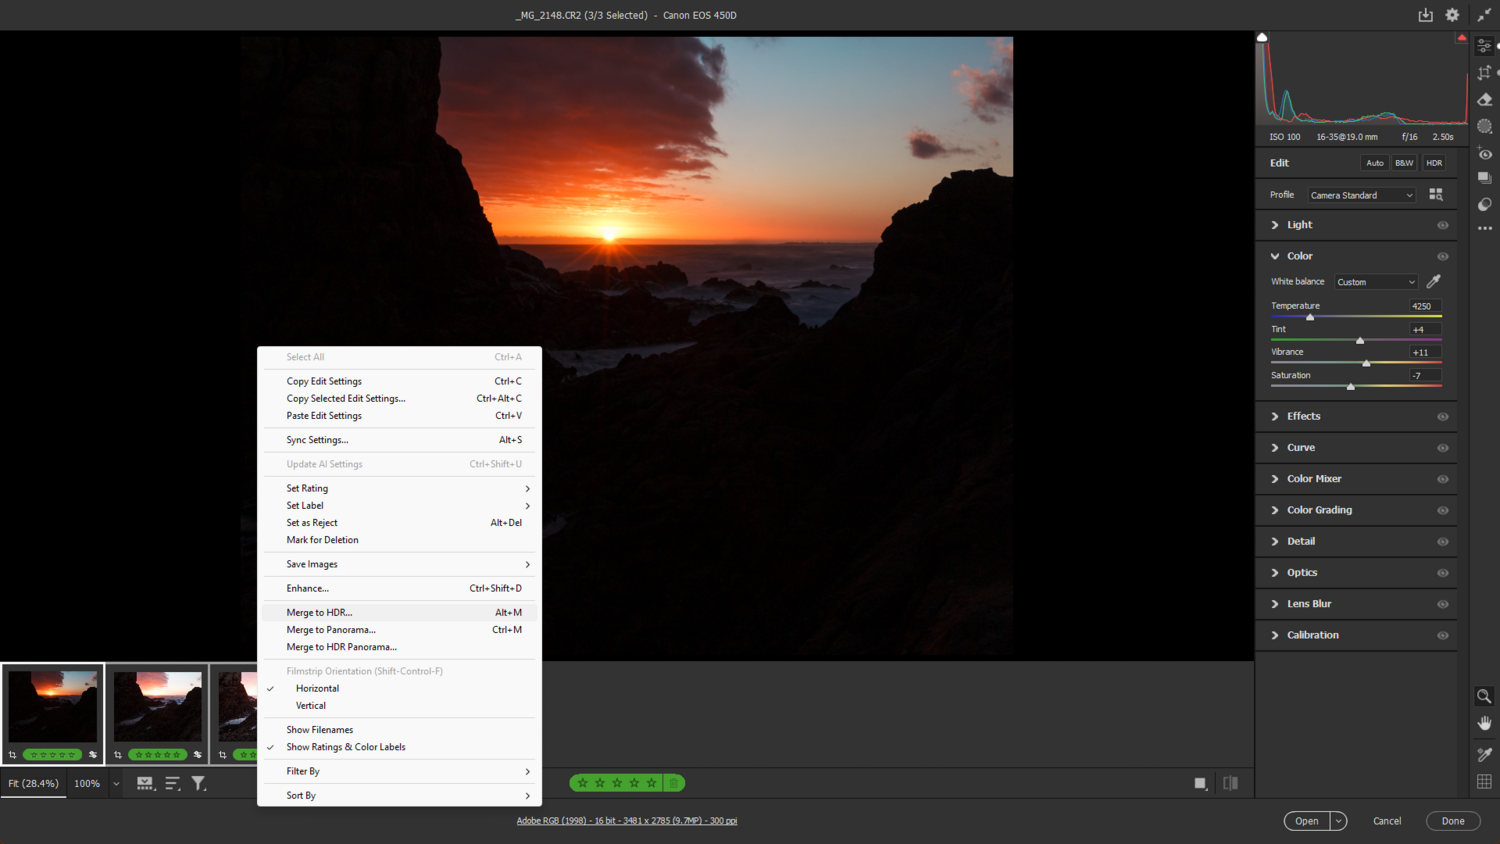
To start the process, open your images in Adobe Camera Raw or Lightroom and select all the photos. Then, right-click on one and select “Merge to HDR.”
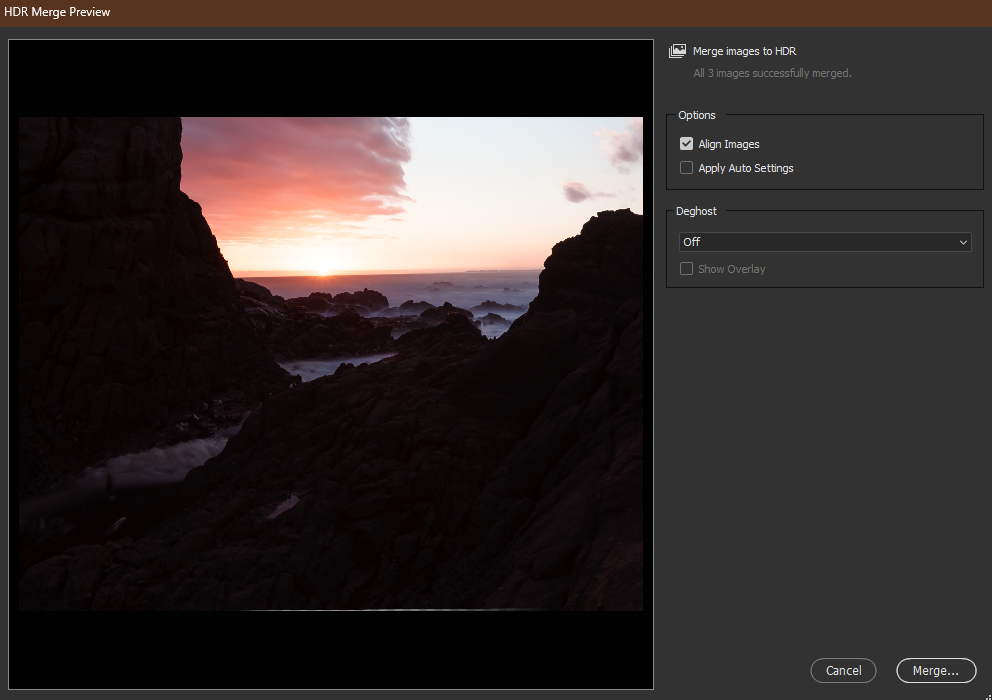
Once you’ve selected the “Merge to HDR” option, a new dialog box appears, allowing you to preview the HDR image. You can also choose to align the photos automatically and apply Auto Settings. I always let it align my images automatically while leaving the Auto Settings feature unticked, as I prefer to do my corrections after generating the HDR image. A third option, “Deghosting,” removes any ghosting or halos from images with harsh exposure changes or elements moving between the frames. This option should eliminate those issues but could add strange artifacts in some scenarios. With the Deghost option unticked, my images were far cleaner.
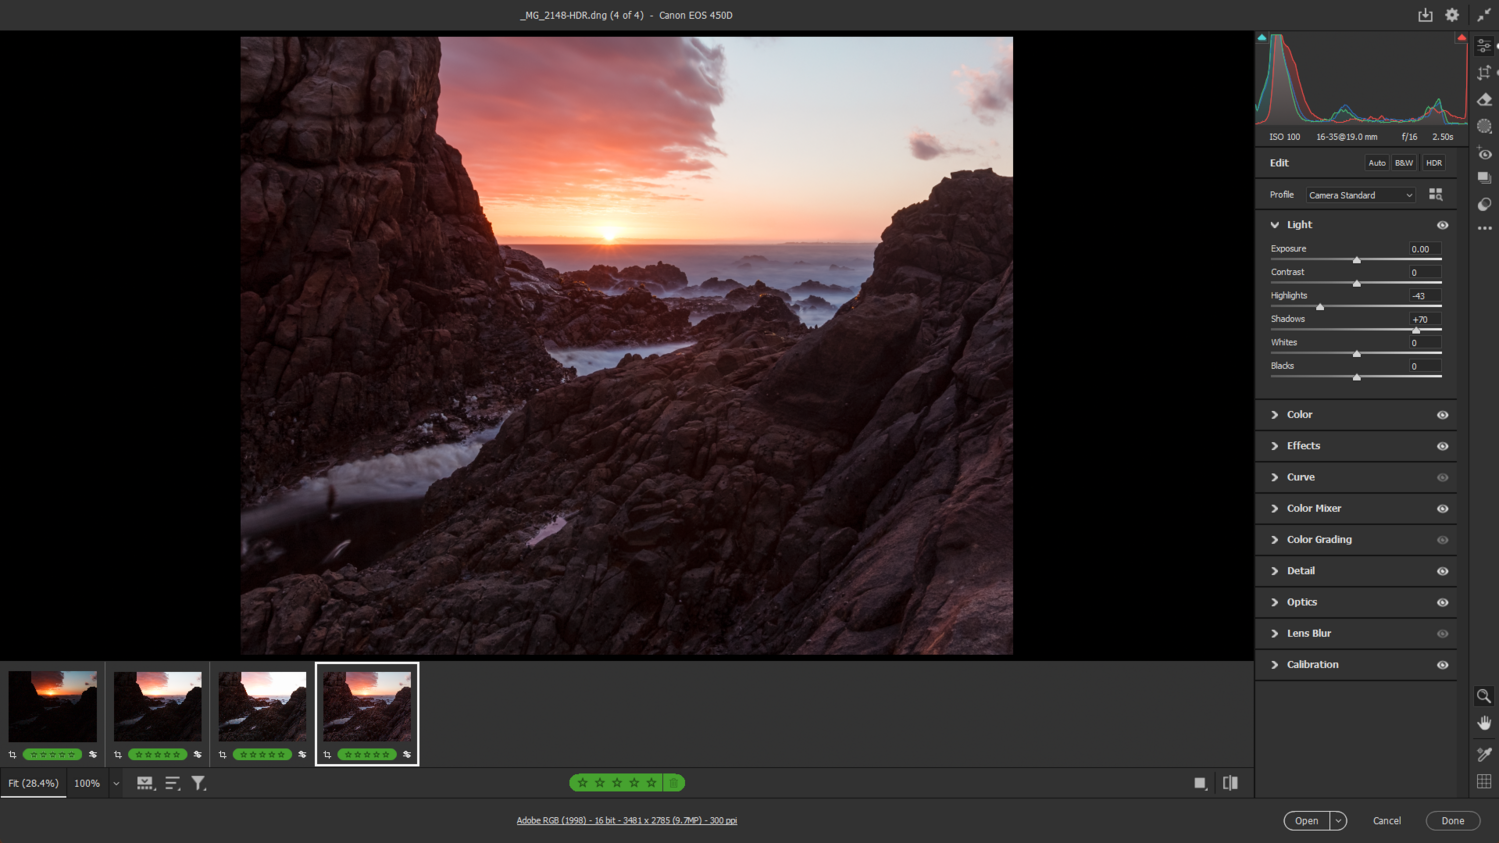
Once you click “Merge,” the software will automatically merge the HDR photos and provide a new HDR image as a .DNG file next to your raw files in the image carousel. You can now tweak the image as desired before posting it online.
Focus Stacking
Another process similar to HDR is focus stacking. Instead of taking several photos with different exposures, we’ll look at taking several pictures with the same exposure but at different focal planes. Using this process, we aim to stack the images again in Lightroom or Adobe Camera Raw to create a photo that is in focus from the foreground to the background.
Like the HDR process, which is fully integrated in-camera in most mirrorless cameras, focus stacking is also implemented through a menu function that the user must toggle on. The function may vary between cameras, but you should be able to switch on the function and select the number of photos taken from one end of the focal plane to the other. Once the focus stacking option is enabled, frame your subject and press the shutter button. You should see the camera automatically taking several images before saving them to your memory card. Again, similar to the HDR function, some cameras can automatically blend the focus-stacked image into a single file.
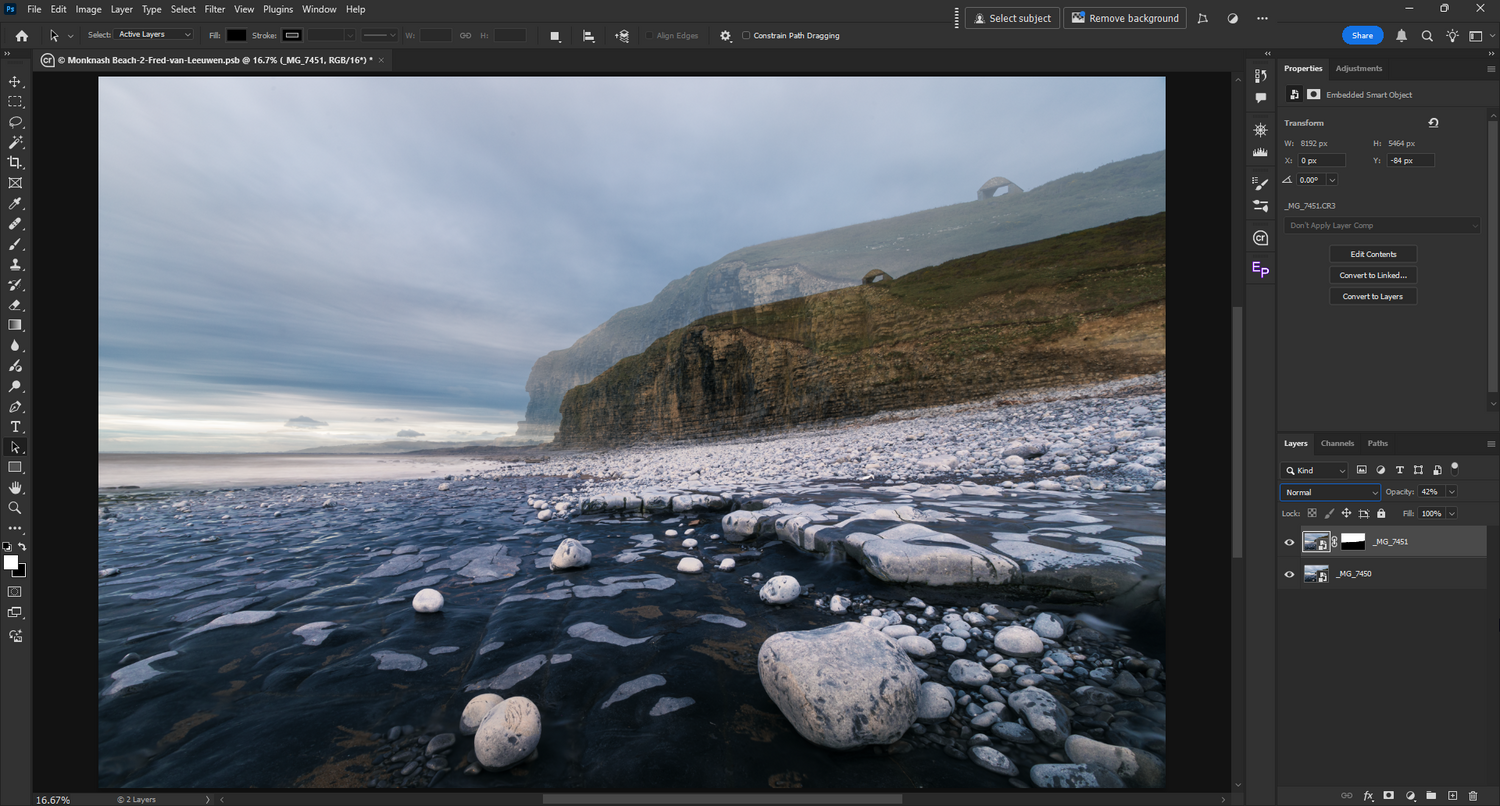
Unfortunately, Lightroom and Adobe Camera Raw lack the functionality to focus stack images without Photoshop, so we’ll need to select our images in Lightroom or Adobe Bridge. With your photos selected, right-click and navigate to the “Edit In” option before selecting the “Load Files into Photoshop Layers” option. Your photos are now loading into Photoshop as layers, which you can process into a stack.
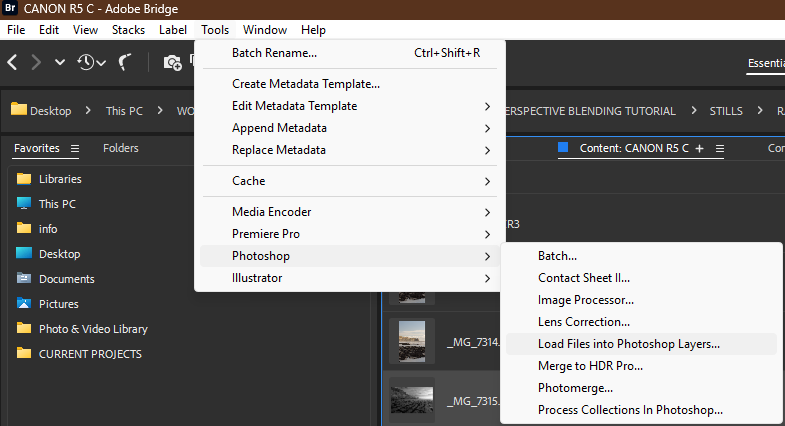
First, we must ensure our layers are all aligned. Click on the “Edit” menu at the top and scroll down to “Auto-Align Layers.” Depending on how many photos you’ve taken, Photoshop may take a short while to align your images.

Once the process is completed, it’s time to stack the images. Like before, click the “Edit” menu and select “Auto-Blend Layers,” which opens up a new dialog box. You can create a panorama or stack the images in the dialog box. To continue, select “Stack Images” and press OK. Again, this may take some time, depending on the number of images you’re stacking and the speed of your computer.
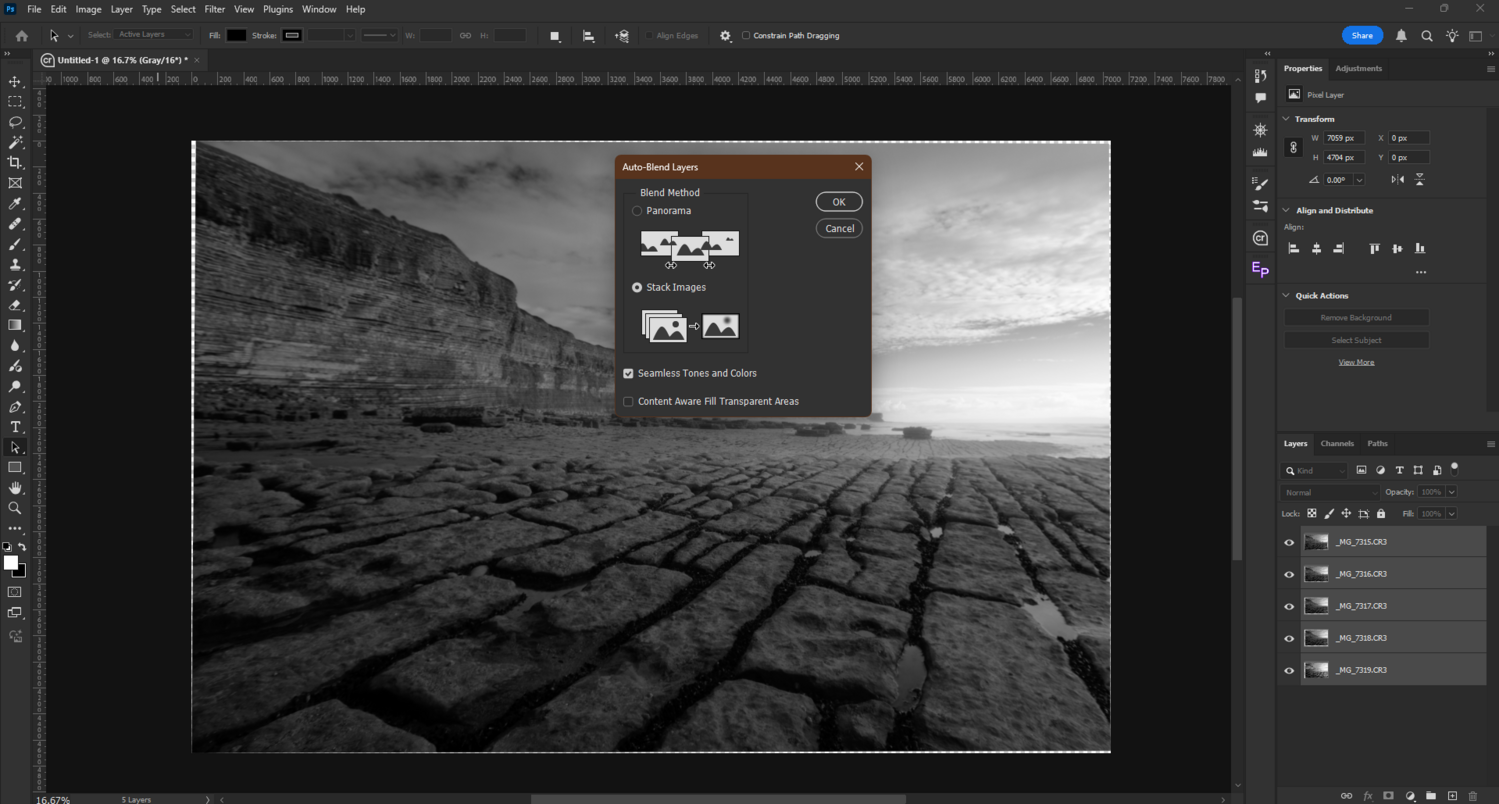
Once the process is finished, you’ll see that your layers have layer masks attached, which blend them all together. It is essential to inspect the photo thoroughly and ensure no artifacts have been introduced due to misalignment or improper focus stacking. One tip I can offer to eliminate any worry about your photos not stacking correctly is to shoot the stack at a small aperture of around f/8 to f/16. This way, your images already have an increased depth of field, which will be combined seamlessly when stacking.
Stitching Panoramas
Panoramic images, with their wide format, are a great way to immerse your audience in a single photograph. However, stitching together multiple photos of a scene by moving your camera incrementally from one side to the other can be daunting, as it increases the likelihood of your images not being stitched correctly. A tripod with a spirit level is essential to ensure success when taking a panoramic image.
Once your camera is level on the tripod, start from one side of your subject and take a photo before moving the camera further to the endpoint. Also, ensure your camera is placed vertically to capture a wider frame from top to bottom. For a more in-depth tutorial on creating panoramic images and the gear required for this process, read my other article, “Do You Really Need Fancy Gear To Shoot Panoramas?”
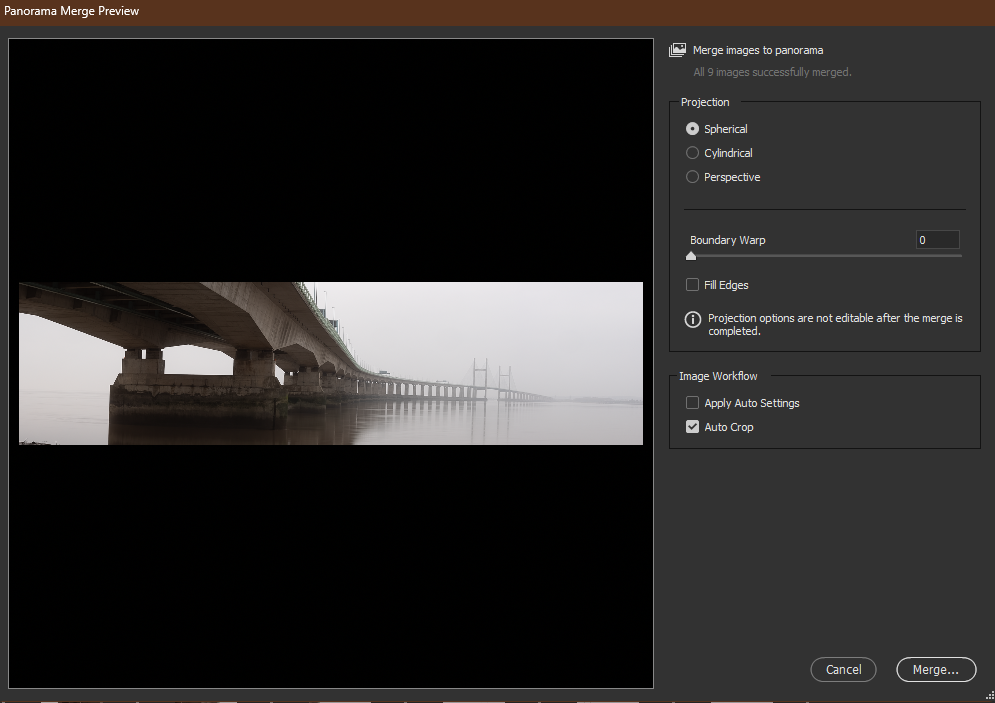
Once you’ve created the panorama, load the series of photos into Lightroom/Adobe Camera Raw as you did with the HDR process. Instead of “Merge to HDR,” select “Merge to Panorama.” A new dialog box will open with projection methods for your panorama. “Spherical,” “cylindrical,” and “perspective” are different ways to project your panorama. Usually, “Spherical” works the best for landscapes, in my experience. Experiment with these to see which method projects your panorama correctly, and proceed to merge your panorama. Just as it did with the HDR process, Lightroom/Adobe Camera Raw will create a new .DNG file for your panorama, which you can use to apply final adjustments.
Focal/Perspective Blending
Focal or perspective blending is somewhat controversial among landscape photographers because it replaces parts of the image with elements from a different photo. Focal blending eliminates barrel distortion when using wide angle lenses by replacing the original background with a close-up version of the same background shot at a tighter focal length. As a result, it brings the background closer to the foreground and, in theory, closer to what the scene resembles in real life. This technique can also be taken further, emphasizing the background details to highlight scale.
For example, imagine you’re shooting an expansive landscape with some foreground shrubbery and large mountains in the background on a 16-35mm lens. Due to the barrel distortion on the 16mm side, those mountains in the distance appear smaller than they would in real life. To eliminate this, you zoom in to 35mm and take another photo using the same composition. In this second image, the mountains appear much closer and more accurately scaled. The two photos are then blended in Photoshop, essentially replacing the background of the 16mm photo with the 35mm version.
To start the process, compose your camera and zoom out to the widest your lens can go. Use the focus stacking technique to ensure your image will be sharp from the foreground to the background. Once you’ve finished shooting the series of pictures at the wide end, zoom in until the background closely resembles what your eye sees. Depending on how far away your background is, you probably won’t need to use focus stacking here. Use this at your discretion. You may also need to reposition the camera slightly, depending on how much it’s already tilted. Once you’re done shooting the scene, it’s time to start processing the two images.
Load your images in Photoshop. If you’ve done focus stacking for the foreground, I suggest completing that step before continuing. Load both into Photoshop as layers once your foreground and background images are ready. Ensure your foreground layer is at the bottom and your background layer is at the top. Set the opacity to around 50-70% for now. This way, you can see whether the two images line up. Move the background layer so it matches up with the horizon of your foreground. Once your images are aligned, create a layer mask on your background layer, and using a brush set to black, start painting away the foreground until only the background with the mountains remains. This process may take some practice, but if done correctly, it can effectively bring the image closer to what the eye sees.
Long Exposures
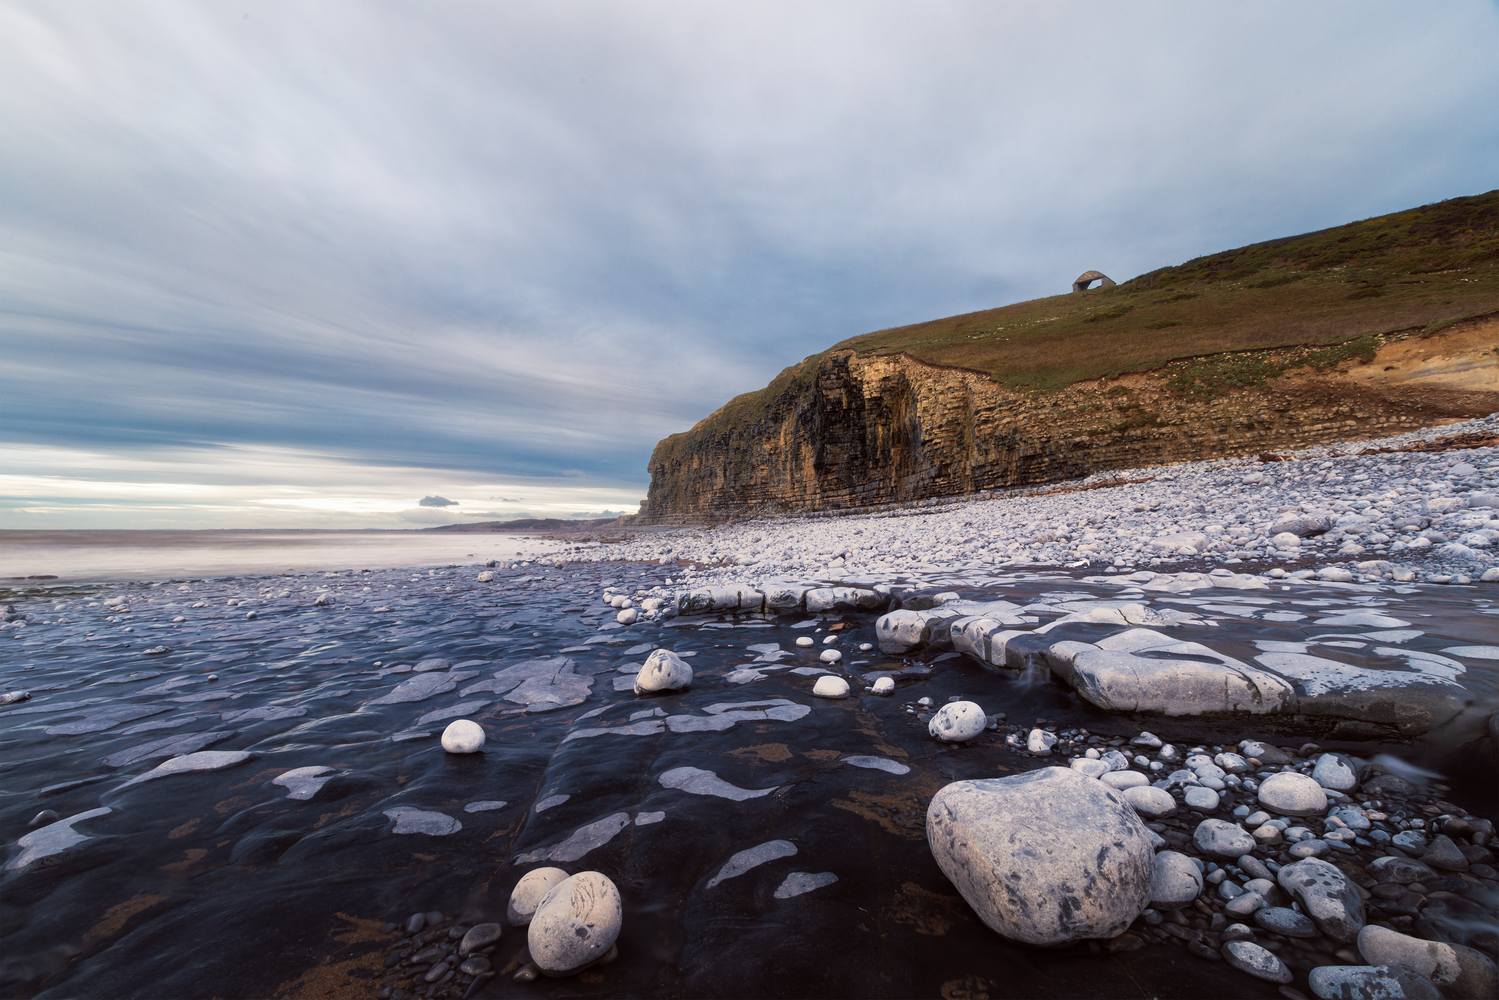
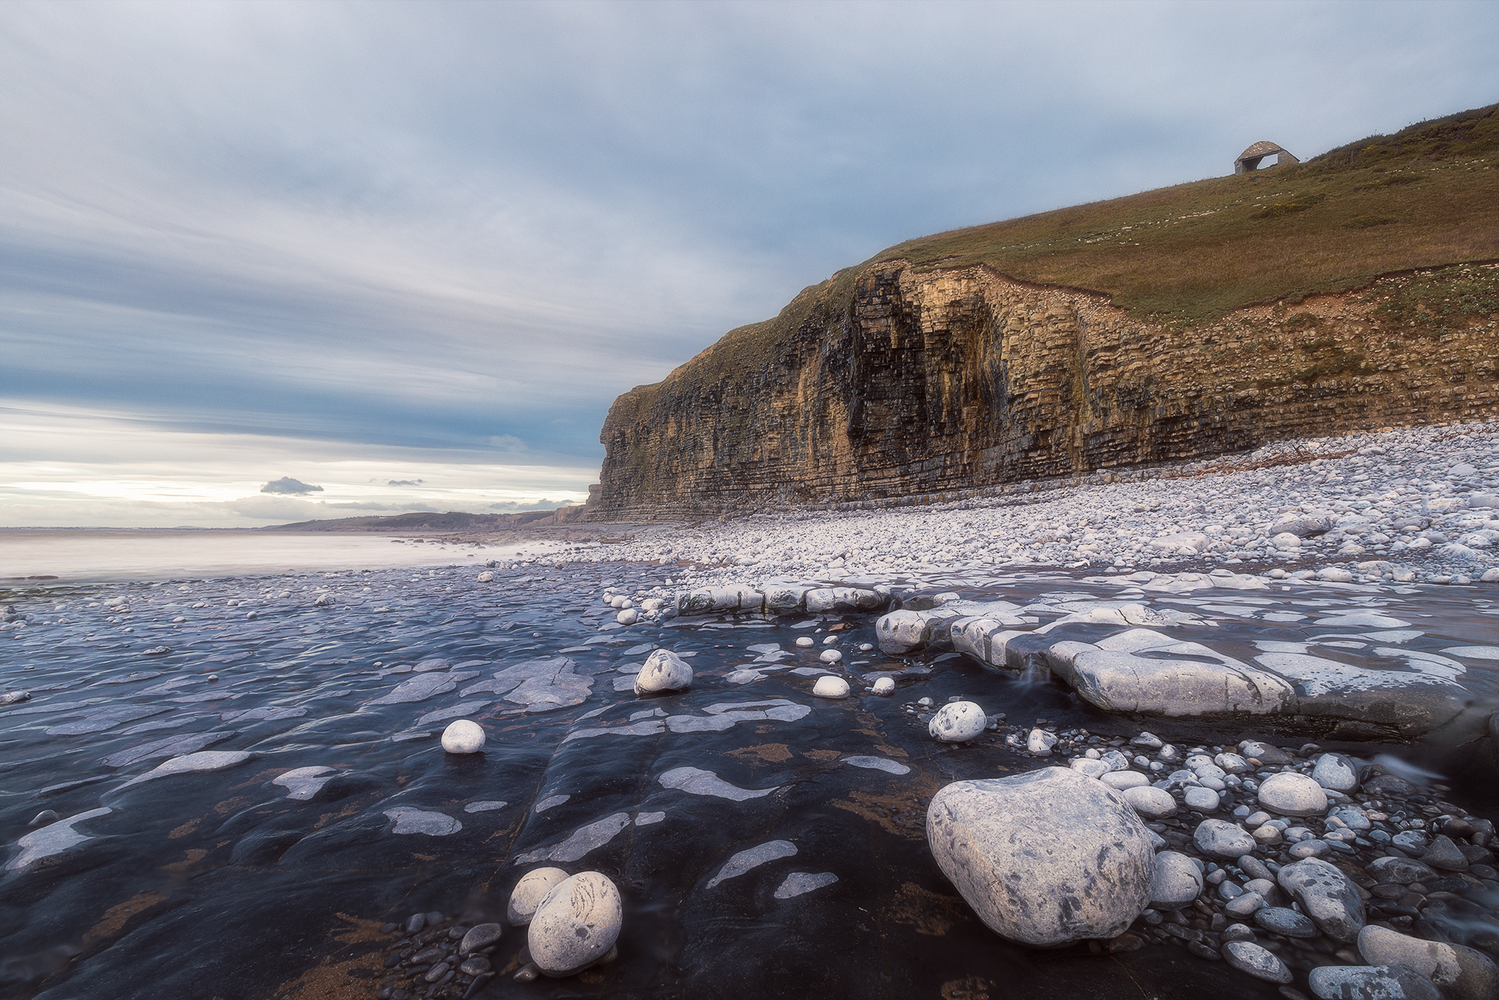
Long exposures are a simple yet incredibly effective technique for showing motion in a scene. They are often used in seascapes or when shooting waterfalls, using a slow shutter speed to introduce motion blur into the scene. For this technique to be effective, you’ll need a tripod to mount your camera, as using slow shutter speeds will result in camera shake when handheld. Compose your scene and set your shutter speed to 1/2 second or slower, depending on your scene. One thing to remember is that a slow shutter speed introduces more light into the camera, so attempting to shoot a scene like a waterfall in bright daylight could result in overexposure, as there’s simply too much light to shoot at a slower shutter speed, even when using a small aperture.
To combat overexposure, landscape photographers use neutral density filters (ND filters), which darken the image depending on the strength of the ND filter used. Certain ND filters let you slow your shutter down to minutes, creating quite an ethereal look to a scene, especially if there’s lots of motion. Other filters, like circular polarizers, also help darken the scene while removing reflections.
There are no fancy post-processing steps here, so once you’re done taking your photo, load it into Lightroom or Adobe Camera Raw and start tweaking the image to your liking.
Bonus Tip: Use All of the Techniques Together
If you’re feeling adventurous and have some time to experiment, consider using all the methods mentioned in this article in one image. This process can be very complex, as there are quite a few things to remember, and it requires a lot of processing power from your computer.
It is essential to plan what you’re going to do. For example, if you’re considering creating an HDR panorama, you’ll need to work out exactly how many shots you need to take and in what sequence. It could be an extremely complex process, but getting it right could be incredibly rewarding. I would probably start by vertically setting my camera for the panorama and shooting the bracketed exposures. I would then shift my camera either left or right to take the following sequence in the panorama. I’d continue this sequence until the panorama is finished.
Lightroom and Adobe Camera Raw can produce HDR panoramas, so you can effectively create a beautiful HDR panorama. If you’re brave, you could experiment using focus stacking and focal blending in the mix, but you’ve got to ask yourself how far is too far.
Mixing one or two of the techniques above could create a beautiful new way to explore landscape photography and provide hours of fun experimenting. Remember to have fun along the way, regardless of which techniques you use.